
IoC控制反转
- 反转的是获取对象的方式。
- 传统
new对象,SpringIoC容器只需要getBean("obj")从容器中获取(applicationContext.xml) - 为了方便理解,IoC改名为DI依赖注入
两种理解:
- 控制反转:将创建对象、属性值的方式 进行了反转,从
new、setObj()反转为了 从springIoC容器getBean() - 依赖注入:将属性值注入给了属性,将属性注入给了
bean,将bean注入给了IoC容器
案例
创建Student实例类
package com.moluuser.entity;

public class Student {
    private int stuNo;
    private String stuName;
    private int stuAge;

    public int getStuNo() {
        return stuNo;
    }

    public void setStuNo(int stuNo) {
        this.stuNo = stuNo;
    }

    public String getStuName() {
        return stuName;
    }

    public void setStuName(String stuName) {
        this.stuName = stuName;
    }

    public int getStuAge() {
        return stuAge;
    }

    public void setStuAge(int stuAge) {
        this.stuAge = stuAge;
    }

    @Override
    public String toString() {
        return "Student{" +
                "stuNo=" + stuNo +
                ", stuName='" + stuName + '\'' +
                ", stuAge=" + stuAge +
                '}';
    }
}
applicationContext.xml
<?xml version="1.0" encoding="UTF-8"?>
<beans xmlns="http://www.springframework.org/schema/beans"
       xmlns:xsi="http://www.w3.org/2001/XMLSchema-instance"
       xsi:schemaLocation="http://www.springframework.org/schema/beans http://www.springframework.org/schema/beans/spring-beans.xsd">
<bean id="student" class="com.moluuser.entity.Student">
    <property name="stuName" value="zs"></property>
    <property name="stuAge" value="18"></property>
    <property name="stuNo" value="5"></property>
</bean>
</beans>
测试类
package com.moluuser.text;

import com.moluuser.entity.Student;
import org.springframework.context.ApplicationContext;
import org.springframework.context.support.ClassPathXmlApplicationContext;

import java.applet.AppletContext;

public class Text {
    public static void main(String[] args) {
        ApplicationContext context = new ClassPathXmlApplicationContext("applicationContext.xml");
        Student student = (Student) context.getBean("student");
        System.out.println(student.toString());
    }
}
Add
创建IoC
public class Client {
    /**
     * 获取spring的Ioc核心容器,并根据id获取对象
     *
     * ApplicationContext的三个常用实现类:
     *      ClassPathXmlApplicationContext:它可以加载类路径下的配置文件,要求配置文件必须在类路径下。不在的话,加载不了。(更常用)
     *      FileSystemXmlApplicationContext:它可以加载磁盘任意路径下的配置文件(必须有访问权限)
     *
     *      AnnotationConfigApplicationContext:它是用于读取注解创建容器的,是明天的内容。
     *
     * 核心容器的两个接口引发出的问题:
     *  ApplicationContext:     单例对象适用              采用此接口
     *      它在构建核心容器时,创建对象采取的策略是采用立即加载的方式。也就是说,只要一读取完配置文件马上就创建配置文件中配置的对象。
     *
     *  BeanFactory:            多例对象使用
     *      它在构建核心容器时,创建对象采取的策略是采用延迟加载的方式。也就是说,什么时候根据id获取对象了,什么时候才真正的创建对象。
     * @param args
     */
    public static void main(String[] args) {
        //1.获取核心容器对象
        ApplicationContext ac = new ClassPathXmlApplicationContext("bean.xml");
//        ApplicationContext ac = new FileSystemXmlApplicationContext("C:\\Users\\zhy\\Desktop\\bean.xml");
        //2.根据id获取Bean对象
        IAccountService as  = (IAccountService)ac.getBean("accountService");
        IAccountDao adao = ac.getBean("accountDao",IAccountDao.class);

        System.out.println(as);
        System.out.println(adao);
        as.saveAccount();
    }
}
bean作用范围
bean的作用范围调整
bean标签的scope属性:
    作用:用于指定bean的作用范围
    取值: 常用的就是单例的和多例的
        singleton:单例的(默认值)
        prototype:多例的
        request:作用于web应用的请求范围
        session:作用于web应用的会话范围
        global-session:作用于集群环境的会话范围(全局会话范围),当不是集群环境时,它就是session
bean生命周期
bean对象的生命周期
单例对象
    出生:当容器创建时对象出生
    活着:只要容器还在,对象一直活着
    死亡:容器销毁,对象消亡
    总结:单例对象的生命周期和容器相同
多例对象
    出生:当我们使用对象时spring框架为我们创建
    活着:对象只要是在使用过程中就一直活着。
    死亡:当对象长时间不用,且没有别的对象引用时,由Java的垃圾回收器回收
依赖注入
IoC容器赋值
- 如果是简单类型(8个基本+String),value;
- 如果是对象类型,ref="需要引用的id值",因此实现了对象与对象之间的依赖关系。
- 在IoC中定义bean的前提:该bean的类必须提供了无参构造
    <bean id="teacher" class="com.moluuser.entity.Teacher">
        <property name="name" value="ls"></property>
        <property name="student" ref="student"></property>
    </bean>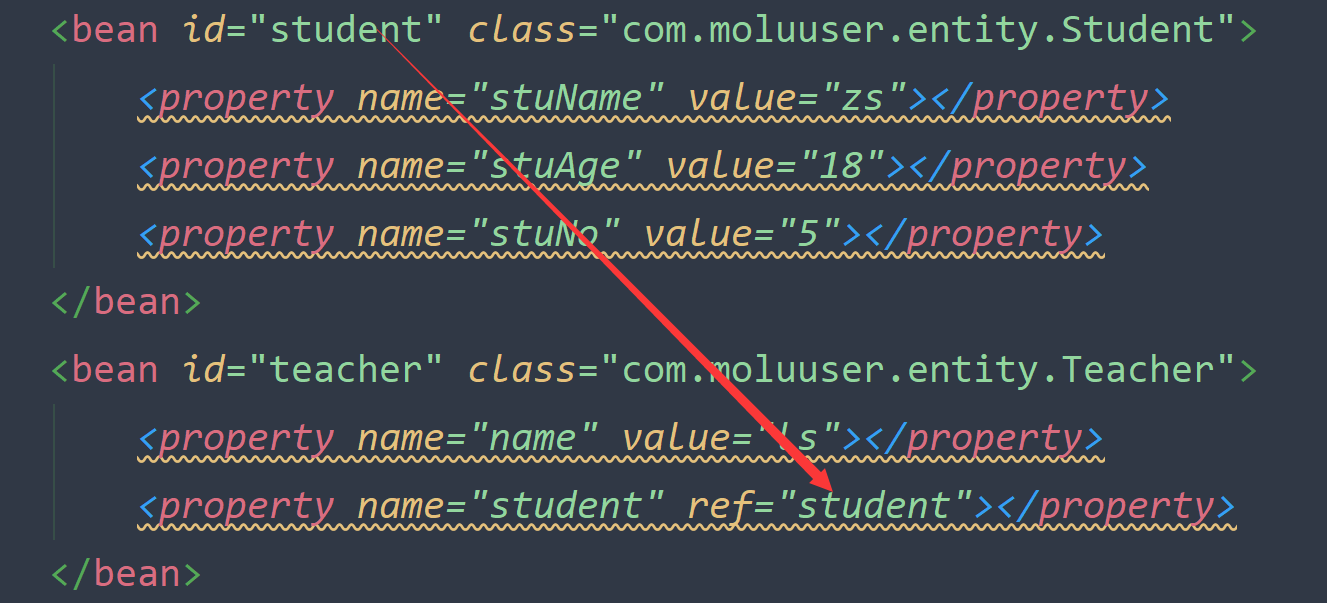
set注入
通过 setObj()赋值
默认使用的是set方法(),依赖注入底层是通过反射实现的。
使用 </property>
构造器注入
通过构造方法赋值<constructor-arg value="ls" type="String" index="0" name="name"></constructor-arg>
- 注意:如果
<constructor-arg>的顺序与构造方法参数的顺序不一致,则需要通过type或index或name指定。
p命名空间注入
在beans标签中加入xmlns:p="http://www.springframework.org/schema/p"
使用以下语句赋值
<bean id="teacher" class="com.moluuser.entity.Teacher" p:name="zs" p:student-ref="student"></bean>集合赋值
- 注入各种集合数据类型: List Set map properties...
- set、list、数组各自都有自己的标签<
set> <list> <array>,但是也可以混着用
注入案例
<?xml version="1.0" encoding="UTF-8"?>
<beans xmlns="http://www.springframework.org/schema/beans"
xmlns:xsi="http://www.w3.org/2001/XMLSchema-instance"
xsi:schemaLocation="http://www.springframework.org/schema/beans
http://www.springframework.org/schema/beans/spring-beans.xsd">
<!-- spring中的依赖注入
依赖注入:
Dependency Injection
IoC的作用:
降低程序间的耦合(依赖关系)
依赖关系的管理:
以后都交给spring来维护
在当前类需要用到其他类的对象,由spring为我们提供,我们只需要在配置文件中说明
依赖关系的维护:
就称之为依赖注入。
依赖注入:
能注入的数据:有三类
基本类型和String
其他bean类型(在配置文件中或者注解配置过的bean)
复杂类型/集合类型
注入的方式:有三种
第一种:使用构造函数提供
第二种:使用set方法提供
第三种:使用注解提供(明天的内容)
-->
<!--构造函数注入:
使用的标签:constructor-arg
标签出现的位置:bean标签的内部
标签中的属性
type:用于指定要注入的数据的数据类型,该数据类型也是构造函数中某个或某些参数的类型
index:用于指定要注入的数据给构造函数中指定索引位置的参数赋值。索引的位置是从0开始
name:用于指定给构造函数中指定名称的参数赋值 常用的
=============以上三个用于指定给构造函数中哪个参数赋值===============================
value:用于提供基本类型和String类型的数据
ref:用于指定其他的bean类型数据。它指的就是在spring的Ioc核心容器中出现过的bean对象
优势:
在获取bean对象时,注入数据是必须的操作,否则对象无法创建成功。
弊端:
改变了bean对象的实例化方式,使我们在创建对象时,如果用不到这些数据,也必须提供。
-->
<bean id="accountService" class="com.moluuser.service.impl.AccountServiceImpl">
<constructor-arg name="name" value="泰斯特"></constructor-arg>
<constructor-arg name="age" value="18"></constructor-arg>
<constructor-arg name="birthday" ref="now"></constructor-arg>
</bean>
<!-- 配置一个日期对象 -->
<bean id="now" class="java.util.Date"></bean>
<!-- set方法注入 更常用的方式
涉及的标签:property
出现的位置:bean标签的内部
标签的属性
name:用于指定注入时所调用的set方法名称
value:用于提供基本类型和String类型的数据
ref:用于指定其他的bean类型数据。它指的就是在spring的Ioc核心容器中出现过的bean对象
优势:
创建对象时没有明确的限制,可以直接使用默认构造函数
弊端:
如果有某个成员必须有值,则获取对象是有可能set方法没有执行。
-->
<bean id="accountService2" class="com.moluuser.service.impl.AccountServiceImpl2">
<property name="name" value="TEST" ></property>
<property name="age" value="21"></property>
<property name="birthday" ref="now"></property>
</bean>
<!-- 复杂类型的注入/集合类型的注入
用于给List结构集合注入的标签:
list array set
用于个Map结构集合注入的标签:
map props
结构相同,标签可以互换
-->
<bean id="accountService3" class="com.moluuser.service.impl.AccountServiceImpl3">
<property name="myStrs">
<set>
<value>AAA</value>
<value>BBB</value>
<value>CCC</value>
</set>
</property>
<property name="myList">
<array>
<value>AAA</value>
<value>BBB</value>
<value>CCC</value>
</array>
</property>
<property name="mySet">
<list>
<value>AAA</value>
<value>BBB</value>
<value>CCC</value>
</list>
</property>
<property name="myMap">
<props>
<prop key="testC">ccc</prop>
<prop key="testD">ddd</prop>
</props>
</property>
<property name="myProps">
<map>
<entry key="testA" value="aaa"></entry>
<entry key="testB">
<value>BBB</value>
</entry>
</map>
</property>
</bean>
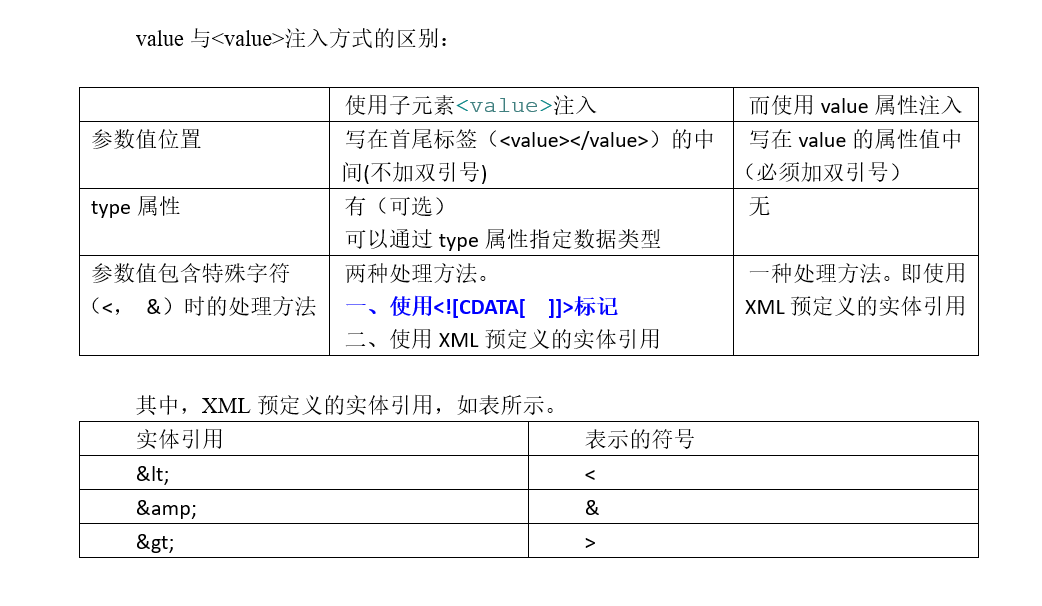
</beans>两种注入方式区别

and
给对象类型赋值 null
        <property name="name" >
                <null/>       -->注意 没有<value>
        </property>
赋空值 ""
        <property name="name" >
                <value></value>
        </property>
自动装配
- 用
ref才可以,基本类型不行<bean ... class="com.moluuser.entity.Course" autowire="byName|byType|constructor|no" >(byName本质是byId) - byName:自动寻找:其他bean的id值=该Course类的属性名
- byType:其他bean的类型(class) 是否与 该Course类的ref属性类型一致 (注意,此种方式必须满足:当前IoC容器中,只能有一个Bean满足条件)
- constructor:其他bean的类型(class) 是否与该Course类的构造方法参数的类型一致;此种方式的本质就是byType
可以在头文件中一次性将该IoC容器的所有bean 统一设置成自动装配:
<beans xmlns="http://www.springframework.org/schema/beans"
...
default-autowire="byName">
自动装配虽然可以减少代码量,但是会降低程序的可读性,使用时需要谨慎。
使用注解定义bean
通过注解的形式将bean以及相应的属性值放入IoC容器
扫描器
<context:component-scan base-package="com.moluuser.dao">`</context:component-scan>Spring在启动的时候,会根据base-package在 该包中扫描所有类,查找这些类是否有注解 @Component("studentDao")`,如果有,则将该类加入Spring IoC容器。
- 等价写法
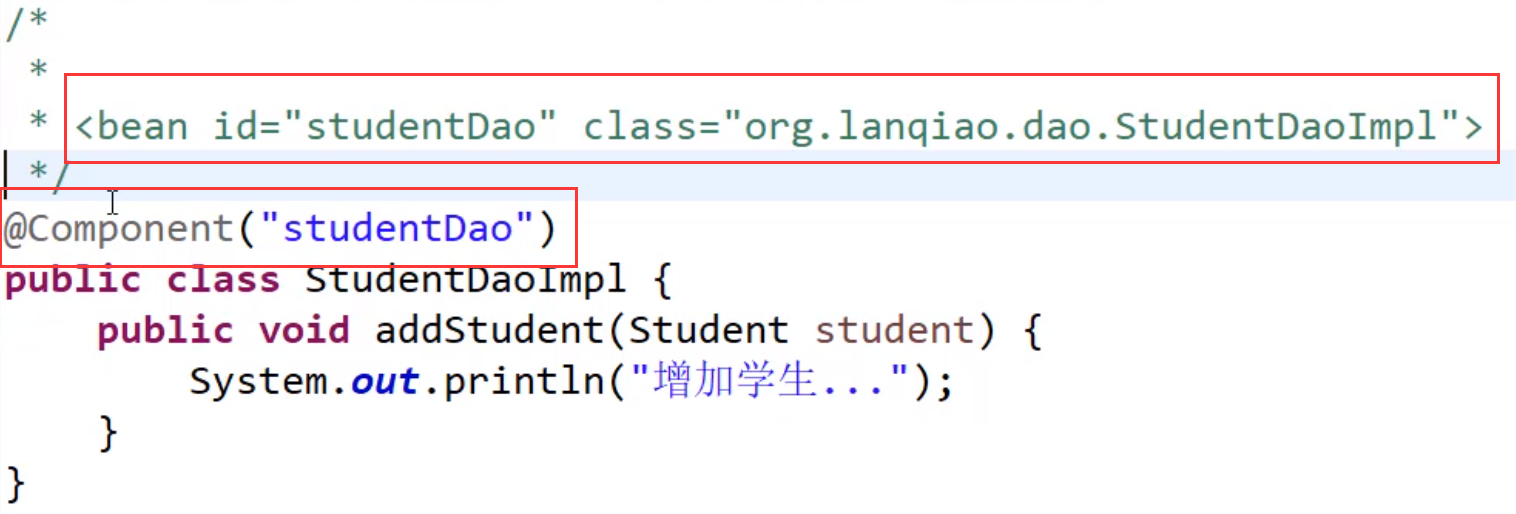
创建对象的注解
@Component范围大,可以细化:
- dao层注解:
@Repository - service层注解:
@Service - 控制器层注解:
@Controller
用于创建对象的
  他们的作用就和在XML配置文件中编写一个<bean>标签实现的功能是一样的
  Component:
      作用:用于把当前类对象存入spring容器中
      属性:
          value:用于指定bean的id。当我们不写时,它的默认值是当前类名,且首字母改小写。
  Controller:一般用在表现层
  Service:一般用在业务层
  Repository:一般用在持久层
  以上三个注解他们的作用和属性与Component是一模一样。
  他们三个是spring框架为我们提供明确的三层使用的注解,使我们的三层对象更加清晰
注入数据的注解
用于注入数据的
  他们的作用就和在xml配置文件中的bean标签中写一个<property>标签的作用是一样的
  Autowired:
      作用:自动按照类型注入。只要容器中有唯一的一个bean对象类型和要注入的变量类型匹配,就可以注入成功
            如果IoC容器中没有任何bean的类型和要注入的变量类型匹配,则报错。
            如果Ioc容器中有多个类型匹配时:
      出现位置:
          可以是变量上,也可以是方法上
      细节:
          在使用注解注入时,set方法就不是必须的了。
  Qualifier:
      作用:在按照类中注入的基础之上再按照名称注入。它在给类成员注入时不能单独使用。但是在给方法参数注入时可以(稍后我们讲)
      属性:
          value:用于指定注入bean的id。
  Resource
      作用:直接按照bean的id注入。它可以独立使用
      属性:
          name:用于指定bean的id。
  以上三个注入都只能注入其他bean类型的数据,而基本类型和String类型无法使用上述注解实现。
  另外,集合类型的注入只能通过XML来实现。

  Value
      作用:用于注入基本类型和String类型的数据
      属性:
          value:用于指定数据的值。它可以使用spring中SpEL(也就是spring的el表达式)
                  SpEL的写法:${表达式}
改变作用范围的注解
用于改变作用范围的
  他们的作用就和在bean标签中使用scope属性实现的功能是一样的
  Scope
      作用:用于指定bean的作用范围
      属性:
          value:指定范围的取值。常用取值:singleton prototype
生命周期相关注解
和生命周期相关
  他们的作用就和在bean标签中使用init-method和destroy-methode的作用是一样的
  PreDestroy
      作用:用于指定销毁方法
  PostConstruct
      作用:用于指定初始化方法
新注解
@Configuration
作用: 用于指定当前类是一个spring配置类,当创建容器时会从该类上加载注解。获取容器时需要使用AnnotationApplicationContext(有@Configuration注解的类.class)。
属性: value:用于指定配置类的字节码

@ComponentScan
作用: 用于指定spring在初始化容器时要扫描的包。作用和在spring的xml配置文件中的: <context:component-scan base-package="com.itheima"/>是一样的。
属性: basePackages:用于指定要扫描的包。和该注解中的value属性作用一样。

@Bean
作用: 该注解只能写在方法上,表明使用此方法创建一个对象,并且放入spring容器。
属性: name:给当前@Bean注解方法创建的对象指定一个名称(即bean的id)。

@PropertySource
作用: 用于加载.properties文件中的配置。例如我们配置数据源时,可以把连接数据库的信息写到properties配置文件中,就可以使用此注解指定properties配置文件的位置。
属性: value[]:用于指定properties文件位置。如果是在类路径下,需要写上classpath:

@Import
作用: 用于导入其他配置类,在引入其他配置类时,可以不用再写@Configuration注解。当然,写上也没问题。
属性: value[]:用于指定其他配置类的字节码。
AOP面向切面
作用: 在程序运行期间,不修改源码对已有方法进行增强。
优势: 减少重复代码 提高开发效率 维护方便
相关术语
Joinpoint(连接点): 所谓连接点是指那些被拦截到的点。在spring中,这些点指的是方法,因为spring只支持方法类型的连接点。
Pointcut(切入点): 所谓切入点是指我们要对哪些Joinpoint进行拦截的定义。
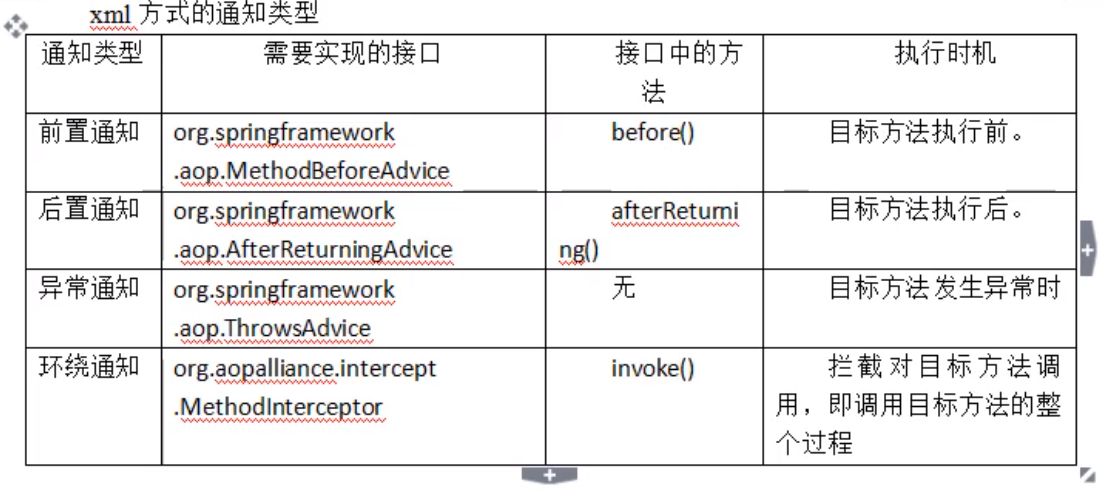
Advice(通知/增强): 所谓通知是指拦截到Joinpoint之后所要做的事情就是通知。 通知的类型:前置通知,后置通知,异常通知,最终通知,环绕通知。
Introduction(引介): 引介是一种特殊的通知在不修改类代码的前提下, Introduction可以在运行期为类动态地添加一些方法或Field。
Target(目标对象): 代理的目标对象。
Weaving(织入): 是指把增强应用到目标对象来创建新的代理对象的过程。 spring采用动态代理织入,而AspectJ采用编译期织入和类装载期织入。
Proxy(代理): 一个类被AOP织入增强后,就产生一个结果代理类。
Aspect(切面): 是切入点和通知(引介)的结合。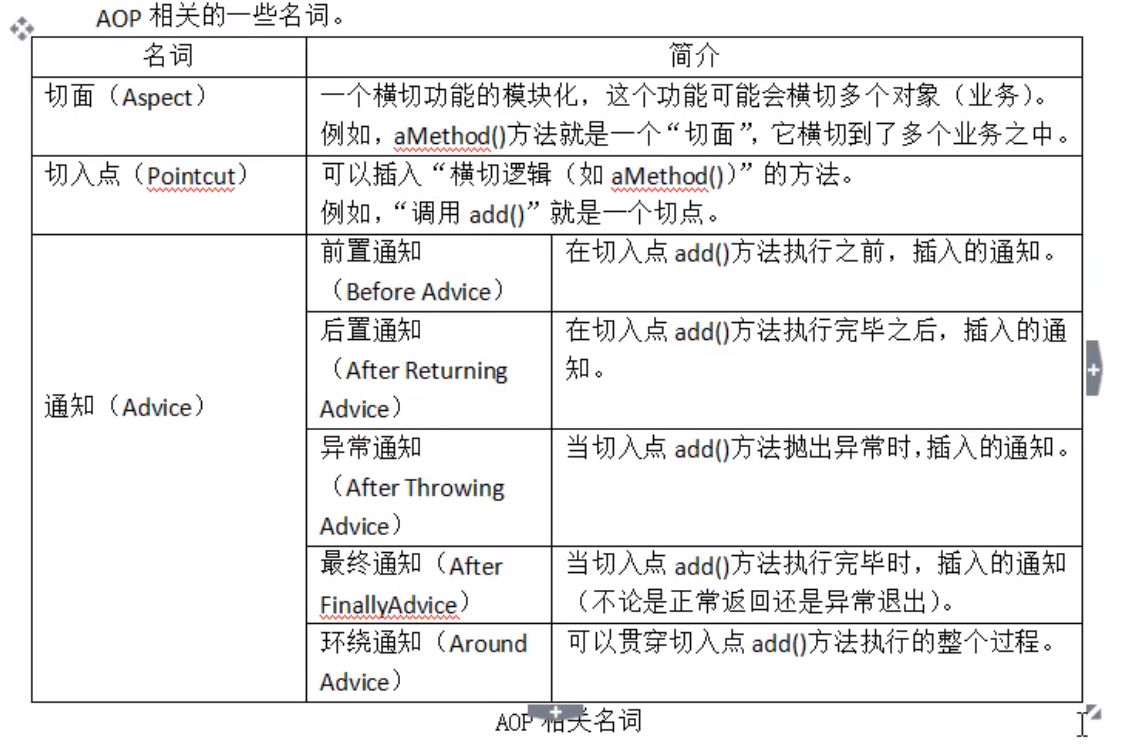
接口实现AOP
配置 appclicationContext.xml
    <aop:config>
<!--        切入点-->
        <aop:pointcut id="" expression=""/>
<!--        关联切面-->
        <aop:advisor advice-ref=""></aop:advisor>
    </aop:config>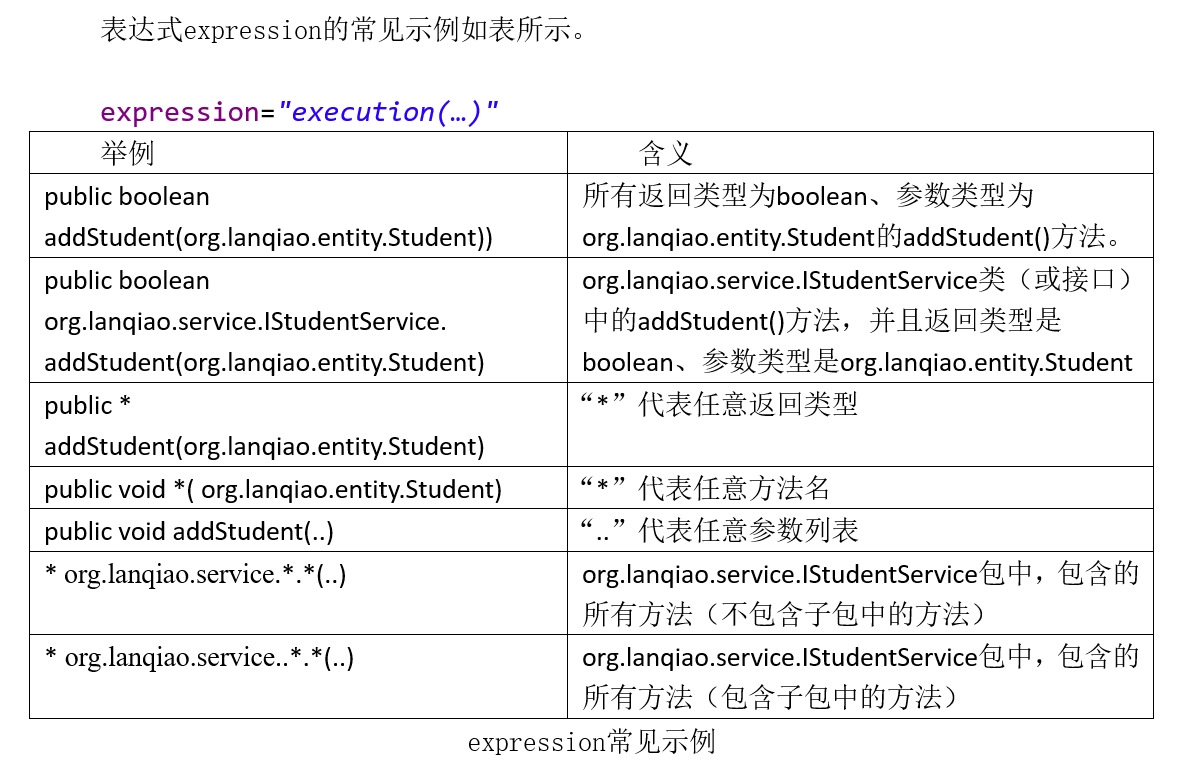
- 环绕通知:在目标方法的前后、异常发生时、最终等各个地方都可以进行的通知,最强大的一个通知。可以获取目标方法的 全部控制权(目标方法是否执行、执行之前、执行之后、参数、返回值等)在使用环绕通知时,目标方法的一切信息都可以通过invocation参数获取到环绕通底层是通过拦截器实现的。
注解实现AOP
@Aspect  //声明该类是一个通知
public class LogBeforeAnnotation  {

}- 注意:通过注解形式将对象增加到IoC容器时,需要设置扫描器
<context:component-scan base-package="com.moluuser.aop"></context:component-scan> - 扫描器会将指定的包中的
@Componet @Service @Respository @Controller修饰的类产生的对象增加到IoC容器中 @Aspect不需要加入扫描器,只需要开启即可:<aop:aspectj-autoproxy></aop:aspectj-autoproxy>- 通过注解形式实现的AOP,如果想获取目标对象的一些参数,则需要使用一个对象:
JointPoint
注解形式的返回值
声明返回值的参数名
    @AfterReturning(pointcut = "execution(public * addStudent(..))", returning = "returningValue")
    public void myAfter(JoinPoint jp, Object returningValue) {
        //returningValue是返回值,但需要告诉spring
        System.out.println("返回值:" + returningValue);
配置实现 类->通知
- 基于Schema配置
- 接口方式通知:
public class LogAfter implements AfterReturningAdvice() Schema方式通知:
- 编写一个普通类
public class LogAfter {} - 将该类通过配置,转为一个"通知"
- 编写一个普通类
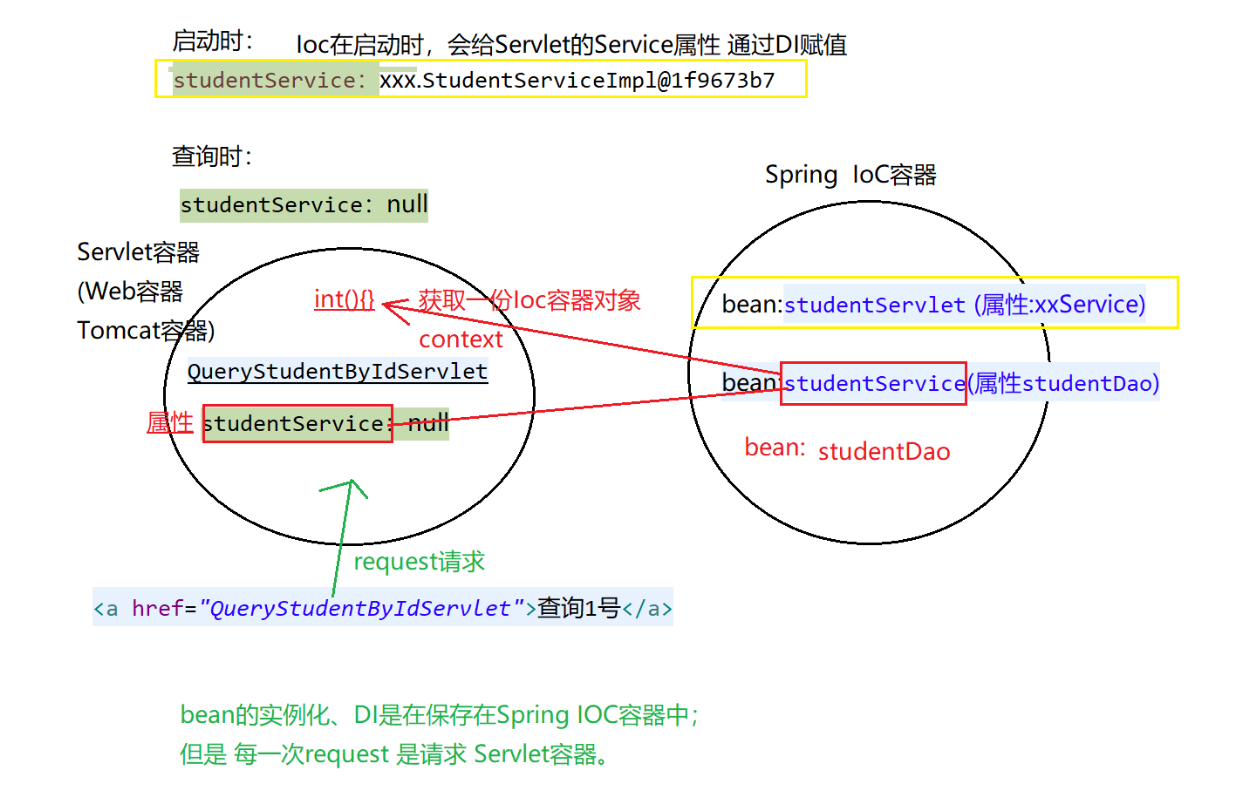
Spring开发Web
- 当服务启动时(tomcat),通过监听器将SpringIoC容器初始化一次(该监听器 spring-web.jar已经提供)
在 web.xml中配置
<!DOCTYPE web-app PUBLIC
 "-//Sun Microsystems, Inc.//DTD Web Application 2.3//EN"
 "http://java.sun.com/dtd/web-app_2_3.dtd" >

<web-app>
  <display-name>Archetype Created Web Application</display-name>
  <context-param>
<!--    配置容器配置文件的位置-->
    <param-name>contextConfigLocation</param-name>
    <param-value>applicationContext.xml</param-value>
  </context-param>
<listener>
<!--  配置监听器,服务启动时初始化IoC容器-->
  <listener-class>org.springframework.web.context.ContextLoaderListener</listener-class>
</listener>
</web-app>
拆分Spring配置文件
Web项目:根据什么拆分?
三层结构
UI(html/css/jsp,Servlet):applicationController.xml
Service:applicationService.xml
Dao:applicationDao.xml
公共数据库:applicationDB.xml
功能结构
学生相关配置 applicationContextStudent.xml <bean id="" class="X...Student">
班级相关配置 applicationContextClass.xml
合并:如何将多个配置文件加载
第一种
<context-param>
          <!--  监听器的父类ContextLoader中有一个属性contextConfigLocation,该属性值 保存着 容器配置文件applicationContext.xml的位置 -->
  <param-name>contextConfigLocation</param-name>
          <param-value>
              classpath:applicationContext.xml,
              classpath:applicationContext-Dao.xml,
              classpath:applicationContext-Service.xml,
              classpath:applicationContext-Controller.xml
          </param-value>
</context-param>
第二种
<context-param>
          <!--  监听器的父类ContextLoader中有一个属性contextConfigLocation,该属性值 保存着 容器配置文件applicationContext.xml的位置 -->
          <param-name>contextConfigLocation</param-name>
          <param-value>
              classpath:applicationContext.xml,
              classpath:applicationContext-*.xml
          </param-value>
</context-param>
第三种
只在
web.xml中加载主配置文件<param-value> classpath:applicationContext.xml </param-value>- 然后在主配置问加中,加载其他配置文件
<import resource="applicationContext-*.xml"/>
Servlet容器和SpringIoC的桥梁
版权属于:moluuser
本文链接:https://moluuser.com/archives/48/
本作品采用知识共享署名-非商业性使用-相同方式共享 4.0 国际许可协议进行许可。

